
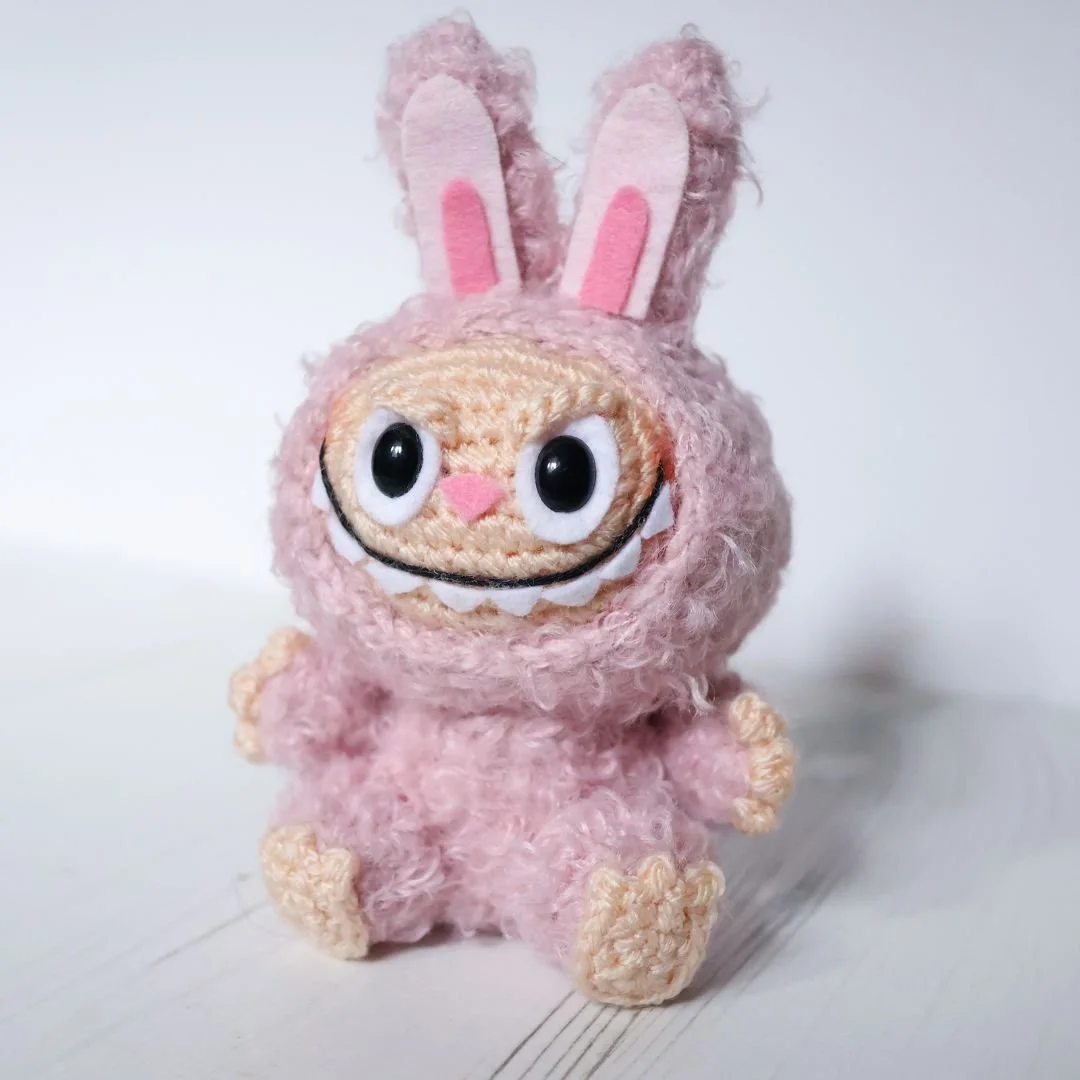
Labubu Amigurumi Pattern
So yeah... I jumped on this demonic bandwagon! And I’m excited to share my pattern with you!
Before we get started, let me share some important things about the pattern.
I’ve made a video showing you how I made the Head, Feet and Fingers... These parts were all made using a 2mm hook and one strand of DK weight yarn – so what I normally use. When crocheting the Head I started with a ch 6 and worked around that to make an oval shape. I get a lot of comments and questions whenever I use this method as it’s confusing to some, which is why I wanted to include the video. The fingers and feet also include some wordy instructions, which is why I wanted to share a visual of that too. The rest of the pattern is made using two strands of yarn, one being very fluffy, so it was too clunky to film... But the instructions are fairly basic, it’s the 2mm hook with two strands of yarn that’s the tricky part... So for this, just take some deep breaths and find a pillow to scream into if it gets a bit frustrating. You’ve got this!
You may wonder why I chose to go with a strand of DK weight yarn AND the fluffy yarn, instead of just one strand of the fluffy one... It was two difficult, Okay?!? I just couldn’t see any of the stitches and it simply wasn’t for me. The strand of DK really helped me see where I needed to place my hook.
Full disclosure... the reason I’ve used a 2mm hook for both the single strand pieces and the two strand pieces is simple. During one of the lovely, hot, sunny London days I packed everything I needed to crochet in the park. Or so I thought... I was meant to bring a 3mm hook too but I left it at home... And I couldn’t not crochet in the park... The London heatwave is no joke, I needed a distraction! So there you go...
If you substitute the yarn it’s going to be very difficult for me to suggest what modifications you need to make since I have only made it in this combination.
***UPDATE 13/08/2025: Removing my comments on potential amendments you can make with different yarns, as they are not based in any kind of testing. I will hopefully be in a position to make some suggestions using other specific fluffy yarns at some point in the future when I’ve had a chance to buy & test how they work with my pattern. Please refer to the Yarn & Hook section further down for exact materials I’ve used making this Labubu.
Anyway, enough about the Face and Head... Once you’ve made all the pieces, pin all of the them in place before sewing to make sure it looks right. Once all the crocheted pieces are attached use fabric glue to attach the felt pieces. I like to leave this part to the end to avoid the glue getting in places it’s not meant to be.
Now... I think that’s it from me. Let’s get started!
YARN & HOOK
2mm hook
Stylecraft Special DK in Toy and Clematis, and Rico Creative Teddy in Pink (002)
10mm black oval safety eyes
Baby Pink, Pink and White
Black embroidery floss
Toy filling
PVA Glue or hot glue
Pins to place pieces before sewing together
Needle
Scissors
Stitch markers (I prefer using scrap yarn as “stitch markers”)
SIZE
Labubu is approximately 13.5cm tall in a seated position, the head is 8cm wide and 6.5cm front to back.
Weight: 50g - this includes all materials used to make Labubu. For context each ball of yarn I’ve used is 100g.
STITCHES & ABBREVIATIONS – UK ENGLISH
ch chain
dc double crochet
tr cluster treble cluster; y.o, insert in the second ch from hook, y.o, pull through st, y.o, pull through two loops, y.o, (two loops left on the hook), insert hook in the same st, y.o, pull through st, y.o, pull through two loops, y.o, pull through remaining three loops
bldc back loop double crochet; working your double crochets in the back loops only
st/sts stitch/es
inc increase; dc 2 in one st
dec decrease; insert hook in the front loop of the next two sts, yarn over, pull through both loops, y.o. and pull through remaining two loops. This is also referred to as an invisible decrease.
y.o. yarn over
THE PATTERN
If you scrolled past the introduction, I would highly recommend scrolling back to the top and reading that before you get started.
HOOD
The piece is worked back to front
Yarn: 1 strand of Stylecraft Special DK in Clematis and 1 strand of Rico Creative Teddy in Pink
ch 6 - we will be working around these chains to make an oval shape.
Round 1: inc in second ch from hook, dc in each of the next 3 chains, inc in last ch from hook, turn and inc on the other side of the same ch, dc in each of the next 3 chains, inc in last ch (14)
R2: (inc 2, dc 3, inc 2) x 2 (22)
R3: (inc 2, dc 7, inc 2) x 2 (30)
This will have created a nice oval shape. We can now continue increases as normal as it will keep it’s oval shape.
R4: (dc 2, inc, dc 2) x 6 (36)
R5: dc 36
R6: (dc 5, inc) x 6 (42)
R7-12: dc 42
R13: (dc 5, dec) x 6 (36)
Fasten off, and create an invisible finish. Using a needle, skip what would be the next st, and insert the needle from front to back in the second st. Pull tight. Insert the needle in the last dc where you fastened off, pull tight. It should now look like the top of any crochet stitch and leave an invisible finish. I like to fasten with a few stitches on the inside of the work, and just stuff the thread into the Hood.
HEAD
The piece is worked front to back – and you will see the increases are the same as the Hood, but since this piece is only worked with one strand it should be small enough to fit inside the Hood.
Yarn: one strand of Stylecraft Special DK in Toy
ch 6 - we will be working around these chains to make an oval shape.
Round 1: inc in second ch from hook, dc in each of the next 3 chains, inc in last ch from hook, turn and inc on the other side of the same ch, dc in each of the next 3 chains, inc in last ch (14)
R2: (inc 2, dc 3, inc 2) x 2 (22)
R3: (inc 2, dc 7, inc 2) x 2 (30)
This will have created a nice oval shape. We can now continue increases as normal as it will keep it’s oval shape.
R4: (dc 2, inc, dc 2) x 6 (36)
R5: dc 36
R6: (dc 5, inc) x 6 (42)
R7-11: dc 42
R12: (dc 5, dec) x 6 (36)
R13: dc 36
R14: (dc 2, dec, dc 2) x 6 (30)
R15: dec 3, dc 7, dec 4, dc 7, dec (22)
Cut out two oval pieces of white felt bigger than your safety eyes. Cut a small hole in the middle to fit the safety eyes, and then place them in R1 st number 7, and R2, st number 1. Add the toy filling back in.
R16: (dec 2, dc 3, dec 2) x 2 (14)
R17: dec 7 (7)
Fasten off. Weave in loose end by inserting darning needle in the front loop of each st and pull tight to close the hole. Place this inside the hood you’ve already created.
EARS
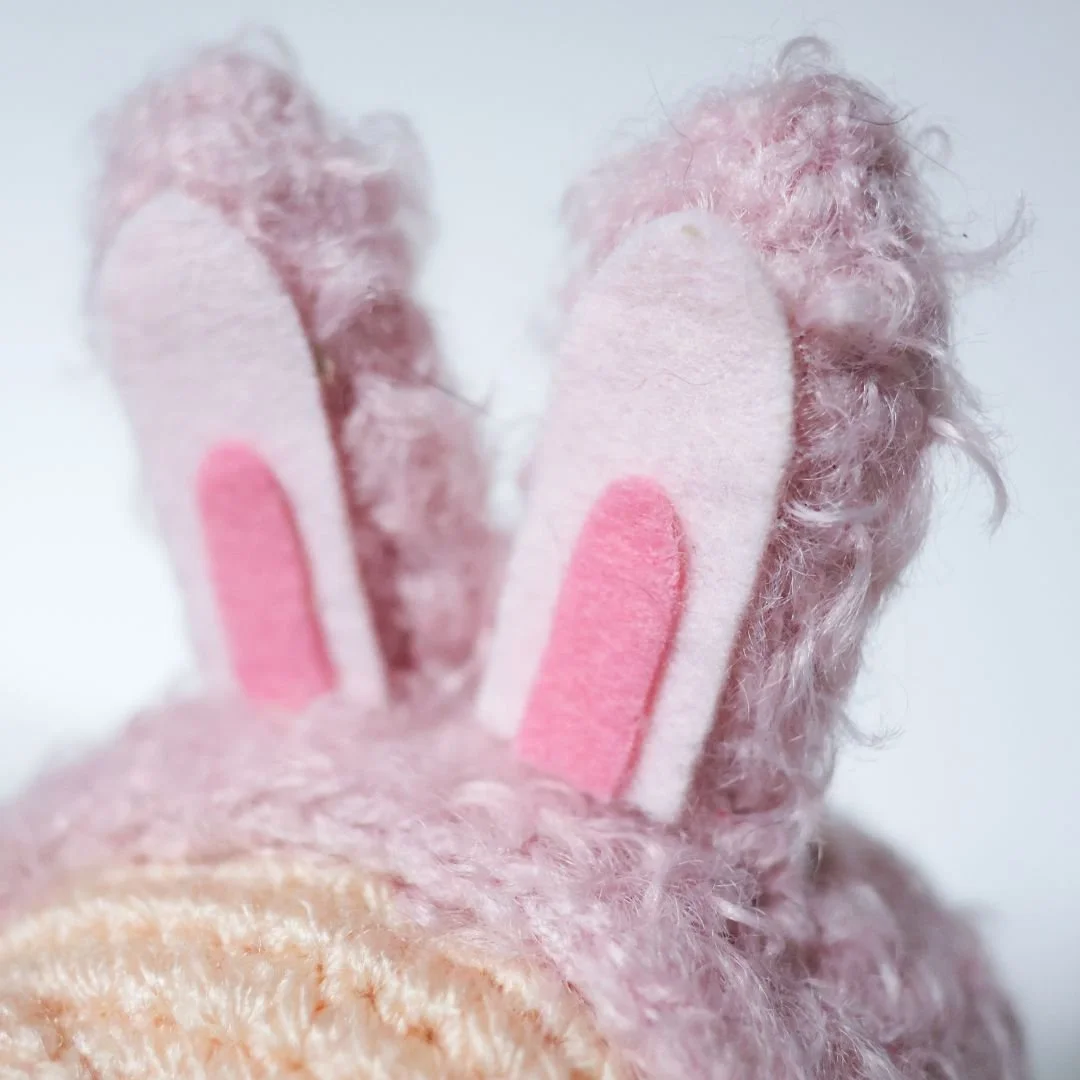
Yarn: 1 strand of Stylecraft Special DK in Clematis and 1 strand of Rico Creative Teddy in Pink
Make 2
Round 1: dc 4 in Magic Ring (4)
R2: inc in all sts around (8)
R3-8: dc 8
Fasten off and leave a long end to sew the ears onto the top of Labubu’s head.
BODY
Yarn: 1 strand of Stylecraft Special DK in Clematis and 1 strand of Rico Creative Teddy in Pink
ch 6 - we will be working around these chains to make an oval shape.
Round 1: inc in second ch from hook, dc in each of the next 3 chains, inc in last ch from hook, turn and inc on the other side of the same ch, dc in each of the next 3 chains, inc in last ch (14)
R2: (inc 2, dc 3, inc 2) x 2 (22)
R3: dc 22
R4: (inc, dc 10) x 2 (24)
R5-7: dc 24
R8: (dc 2, dec) x 6 (18)
R9: dc 18
Fasten off and leave a long end to sew the piece onto the bottom of the hood.
LEGS
Yarn: 1 strand of Stylecraft Special DK in Clematis and 1 strand of Rico Creative Teddy in Pink
Make 2
Round 1: dc 5 in Magic Ring (5)
R2: inc in all sts around (10)
R3: bldc 10
R4: (dc 2, inc, dc 2) x 2 (12)
Fasten off and leave a long end to sew the legs onto the body in a seated position.
FEET
Yarn: one strand of Stylecraft Special DK in Toy
Make 2
ch 3 - we will be working around these chains to make an oval shape.
Round 1: inc in second ch from hook, inc in last ch, turn and inc on the other side of the same ch, and inc in last ch (8)
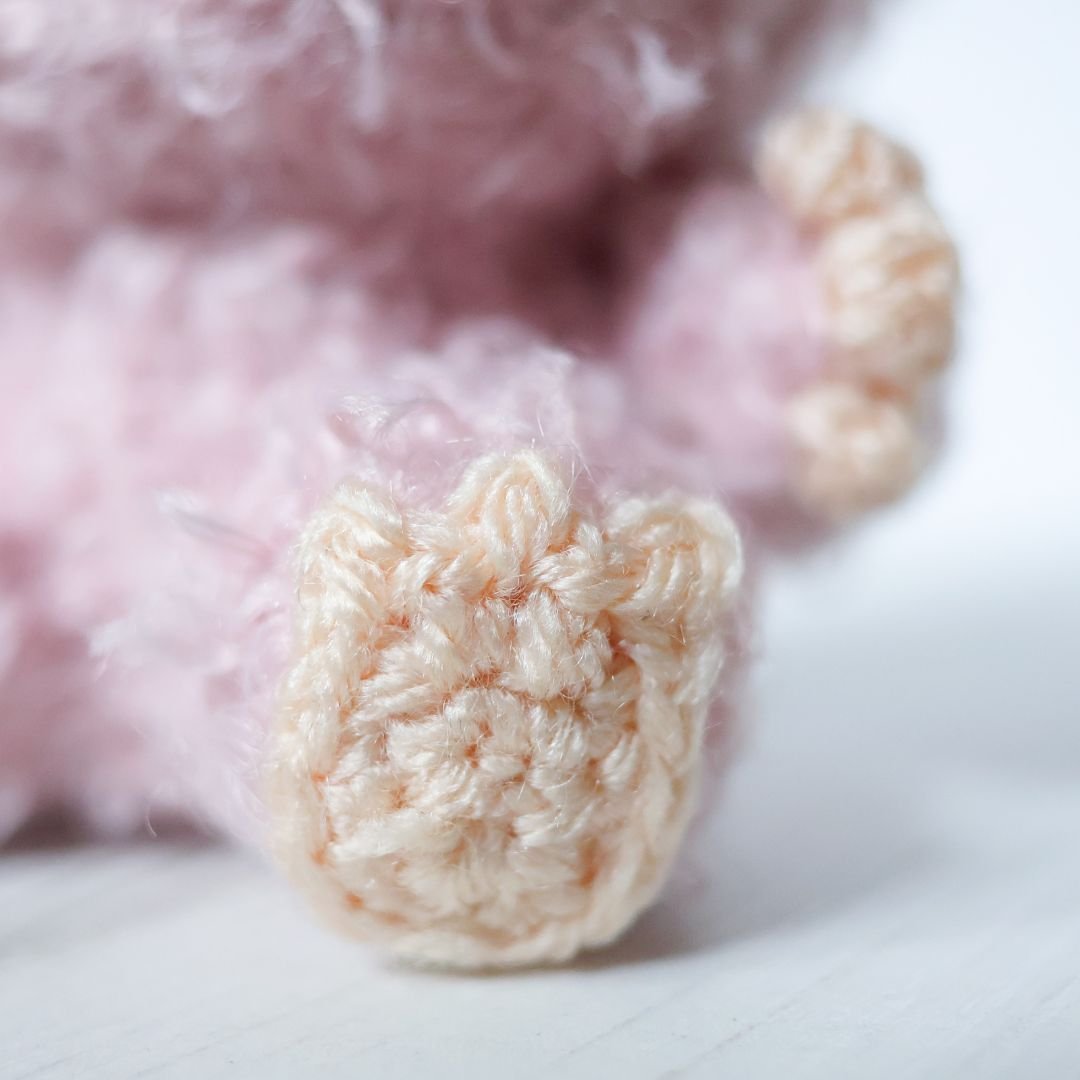
R2: inc, dc 2, (all in the next st: dc, ch 2, sl st in the second ch from hook, dc, ch 2, sl st in the second ch from hook), (all in the next st: dc, ch 2, sl st in the second ch from hook, dc), dc 2, inc
Fasten off and leave a long end to sew the feet onto the bottom of the legs.
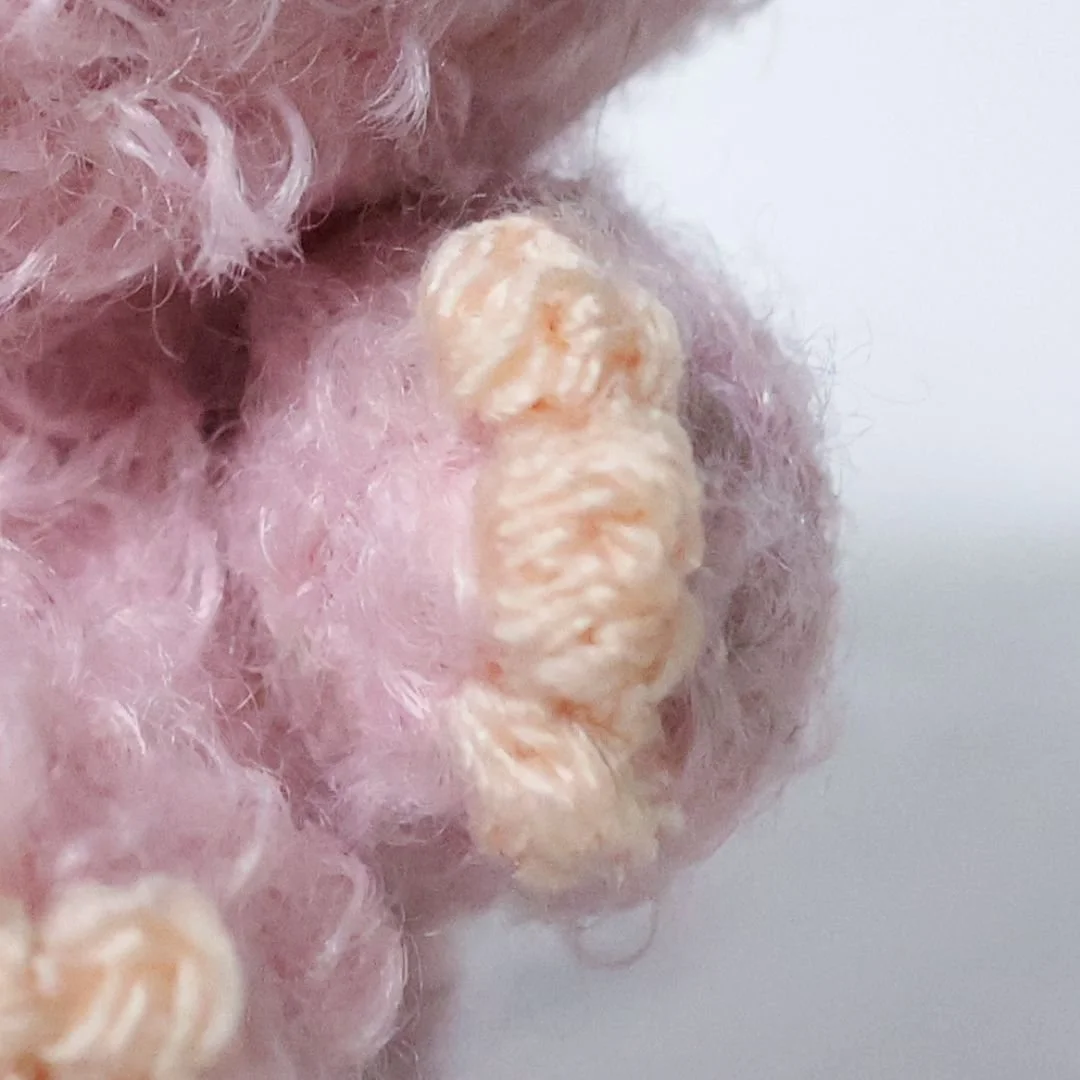
ARMS
Yarn: 1 strand of Stylecraft Special DK in Clematis and 1 strand of Rico Creative Teddy in Pink
Make 2
Round 1: dc 6 in Magic Ring (6)
R2: (dc, inc) x 3 (9)
R3-6: dc 9
Fasten off and leave a long end to sew the arms onto the side of the body with the tips facing forward.
FINGERS
Yarn: one strand of Stylecraft Special DK in Toy
Make 2
ch 6
Row 1: y.o, insert in the second ch from hook, y.o, pull through st, y.o, pull through two loops, y.o, (two loops left on the hook), insert hook in the same st, y.o, pull through st, y.o, pull through two loops, y.o, pull through remaining three loops (tr crochet cluster made), sl st in the next ch, repeat a tr crochet cluster in the next ch, sl st in the next ch, repeat a tr crochet cluster in the next ch, sl st
Fasten off and leave a long end to sew the fingers onto the bottom of the arms.
EYEBROWS
Yarn: one strand of Stylecraft Special DK in Toy
Make 2
ch 5
Row 1: sl st in second ch from hook and each of the next three chs.
Fasten off and leave a long end to sew them onto Labubu’s face, at an angle along the top of the eyes.
FELT & EMBROIDERY FLOSS
Use black embroidery floss to sew on Labubu’s smile. I used some of my blush for the cheeks.
To decorate the ears, cut out two sets of ear-shaped felt pieces in two different shades, two of them smaller and in a darker colour than the first set. Glue them onto the front of the ears.
To make Labubu’s nose, cut out a small triangle of felt and glue it on between the eyes. Use the same colour as the darker colour used for the ears.
To create the teeth, cut out 9 small curved white triangles and glue just below the black embroidery floss. I used my tweezers to dip them into glue and then pressed them on. This is the first time I used my tweezers like this, and it’s a brilliant hack! How have I not done this before? You may have spotted from the photos that I actually only gave my Labubu 8 teeth… But the actual Labubus for some reason have 9 teeth…
Anyway, that’s your Labubu done!
If you used different yarns to me, and the combination worked, please do drop them in the comments!
THANK YOU & ENJOY!
Please do not reprint, sell or claim the pattern as your own.
I’ve loved creating this pattern so please don’t forget to credit the pattern designer.
I would love to see your creations! Please remember to tag me in your social media posts and use the following hashtag #loopycathrineamigurumi
For any questions about the pattern, please comment below and I will do my best to help.